Adaptive/Assistive 3.5mm Button
Summary
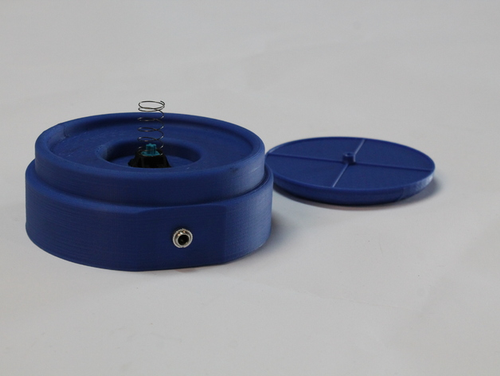
What
This is a low cost, printable AT button. It interfaces with any standard 3.5mm mono jack system, commonly found in support situations for people living with physical disabilities.
AT buttons are a way for someone with a limited range of motion to control his or her environment at the same level as anyone else. These buttons can be used to adapt toys and home appliances such that they can be actuated with ease. Most AT buttons available are quite expensive, and are engineered to be used in serious – 100% reliability – situations. As a result there are a lot of DIY projects to make buttons meant for more relaxed use cases. We wanted to make a button that can be used for toy adapting and similar functions, while also providing a clean and durable design.
Why
This button was created as part of a team-based senior design course. We worked with a local organization, UCP and TASC of Huntsville, to design and construct an AT keyboard and AT button.
How
Making one button takes me about 8 hours of printing and 1 hour of assembly.
Materials
- Cherry MX Switch
- 3.5mm Mono Port
- 6" or so of wire
- Optional: Compression spring for adjusting the button’s actuation force.
- Optional: 3.5mm Mono cable to connect the button to things
- Optional: drawer/shelf/toolbox liner or dual-lock or velcro as a grip base
Assembly
- Print the button base, button hatch, and and key cap.
- Solder the MX switch to the mono port with two pieces of wire, about 3 inches each.
- Install the MX switch in the middle of the button base, and then run the mono jack to the port on the flat side. Screw the mono port’s threads into the hole in the side of the button.
- Jam the key cap onto the cherry MX switch. This can optionally be done with a light spring over the switch stem to adjust the force of the button.
- Optionally glue or bolt (M3 bolts) the shelf liner to the bottom of the button to make a no-slip base!
Can also optionally have superglue to hold things together.
Doing Things With AT Button
Here I’m just running through some small use cases that I’ve personally found for this button.
Control a computer via an Arduino
You can use a small firmware on an arduino along with a shell script to automate tasks on your computer. In the example code the shell script uses xdotool to generate a Right arrow key press, which allows me to use the button to advance slides in a power point.
Control a computer via microphone input
You can also wire the button directly to a computer’s microphone and detect button presses. This is still something we’re looking into, and hope to return with more robust code.
Print Settings
Printer Brand:
Printrbot
Printer:
Simple Black
Rafts:
Doesn’t Matter
Supports:
No
Resolution:
0.25
Infill:
10%
Notes:
I print the base piece at a low-infill to save plastic, but higher infills give you a very satisfying heft.
How I Designed This
Programs
Designed with Inkscape, OpenSCAD, and FreeCAD.
Keycap
The key cap was made with OpenSCAD files from gcb’s repo.
Anti-Warp
I had a lot of trouble with warping and lift-off with these large parts since my printer isn’t calibrated very well. To account for this, the base part has a design etched in the bottom of it to try and minimize warping. If you would rather not have this, please contact me and I’ll work on maintaining a separate version of that file without the anti-warp pattern.
